Got round to sticking the stick and button stenceis to the metal CP and used 2 types (24mm & 30mm) of Q-Max metal sheet punchers, quality bits of kit....

Stripped the rotary mech, sanded it down and gave it a coat of vanish, shall grease the wheels up and reassemble...

Sanded down the CP housing and used filler on the chunks and scrapes, sanded down again and the primed the CP, looks good ;D.....


I reassembled the monitor mounting plate and fitted it back in the cab..

then greased up the wheels and rotary mech and place in back on the mounting plate
Right now for the bit of the project i was dreading the most.....
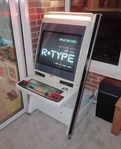
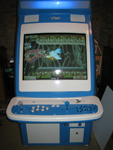
We shall be putting this...

Into this cab...

To achieve this...

First of we have to discharge the tube, now most modern Monitors discharge themselves but you never know so its best to be safe than sorry.
To do this you need a flat head screw driver with a rubber handle if possible, a high conductive bit of wire about 2 feet long and 2 croc clips, attach the 2 clips to either end of the wire. Now attach one clip to the earthing strap on the rear of the tube of the monitor and the other clip to any metal part of the screw drive and a maybe a rubber glove...well i did..

Now only every use one hand when working on monitors place you free hand behind your back or in your pocket. Place the screw driver under the red anode cap (looks like a suction cap).....

and push towards the center of the anode cap where 2 pins are, you'll either hear a crack sound or like i did nothing, do this a few time just to make sure the tube is properly discharged, once done it should now be safe to remove the cap.
Pull the rubber/plastic bit of the suction cup back to expose the 2 pins, pinch the pins together so you can release the cap from the tube, you may need to add quite a bit of pressure. Once removed you can breath a sigh of relief...

now remove any other wires from the PCB to the tube to get to this..

Now time to fit the tube into the rotary device of the Egret II, as lucky would have it no modding to the tube or rotary device is need :applaud: its a straight fit....

Now the bit where this falls down slightly, the plastic screen bezel doesnt quite fit the radius of the monitor

....


While the bezel was still against the screen, i placed a penicl against the screen and drawed on the beezl in the 4 corners where it was press against the screen....

I then took a dremel to the bezel...
[imghttp://img149.imageshack.us/img149/8144/img0188rs7.jpg][/img]

After shaving the corners with the demel and placing the bezel back in the cab again, going back to the work bench, rinse and repeat a few times i got to this stage...


But alas the top of the bezel i could not get as close as the rest of the sides no matter how much i shaved from the corners :-\ ....

But i can live with the small gap
As you can see there is just enough space at the rear of the tube for the anode cap to go back on, thew

.....

I had to cut the cable ties on the wires on the PCB as they were not long enough, i had to place the PCB on a box on the floor of the cab, as with it mounted in the cab there wasnt enough space to get my big head inside the cab as well to see where the wires had to plug in

, i only had to chop one wire as it wasnt long enough, one of the black ground wires, you can probably see the chocolate block in the picture....


 ....
....